Mav 3000
Member
Registered: 16th Aug 01
Location: Leicestershire
User status: Offline
|
I saw that Motorworld sell carpet. as do speeding.co.uk - these places wanted £20. I paid £12.99 for the almost exact colour match to the Vaux boot from a local motor factors. Look where they keep the sub boxes they sell and the carpet will be around there. Most places should order in what you need.
The amp was marked out roughly with about .5 - 1cm under-estimating and was then cut out with a jigsaw (black and decker quattro is an excellent thing!) I then kept cutting away bit at a time the cable holes little by little using a ruler and pencil to outline the holes.
the amps dimensions will be on the box or website if you haven't got the parts yet so that will help planning - then its using patience, a ruler and a tpe measure, and tirla and error. work slowly and gradually instead of an 'all at once' approach and you'll not waste any MDF.
The amps top was smaller than the base so it wasn't a case of using it as a stencil - just roughly mark it out and cut under - then cut a bit more, compare - reapeat until happy  Im also hooking the carpet under to give smooth edges so I gace 2mm alowance for the carpet to pass the amp too. Im also hooking the carpet under to give smooth edges so I gace 2mm alowance for the carpet to pass the amp too.
the holes to allow access to the RCAs and gain controlls will be hidden by carpet flush with the amp too - you'll see
Its easier than I thought to be honest, and a great weekend project. Going to wire it up this afternoon hopefully!
Thanks for the comments! Keep them coming!
|
SXi_Si_2002
Member
Registered: 13th May 02
Location: Southampton
User status: Offline
|
Cool, nice to see people doing little things like this and giving decent advice on how they did it.
I work 4 days on 4 days off so i get a good chance to make some progress. will get some mdf on tuesday i think. make a start ill post some picks to so maybe i could add to any help if my finished product is any good.
|
Mav 3000
Member
Registered: 16th Aug 01
Location: Leicestershire
User status: Offline
|
Nice one didnt get far today! I'll post pics when I make progress (long story!)
|
Mav 3000
Member
Registered: 16th Aug 01
Location: Leicestershire
User status: Offline
|
Just noticed tis thread has had over 800 views! roll on 1000!
|
Mav 3000
Member
Registered: 16th Aug 01
Location: Leicestershire
User status: Offline
|
Latest pics of the finished Amp unit ready to be wired up. remote lead stems off of RCA cable and has been extended under the amp to its other side. Wiring to be added later once lengths have been figured out.
Questions and comments most welcome.
Finished Box:

End-On:

Carpet covers inputs and controlls, but allows easy access due to cut-back MDF:

[Edited on 06-10-2003 by Mav 3000]
|
SXi_Si_2002
Member
Registered: 13th May 02
Location: Southampton
User status: Offline
|
looking good, going to buy the wood to start mine today.
|
Mav 3000
Member
Registered: 16th Aug 01
Location: Leicestershire
User status: Offline
|
I had to cut the MDF back a bit where the ground and earth cables go as there too thick to bend back - the connectors wouldn't screw down! apart from that its ok, but my Central Locking problems having to take priority over this  hopefully this weekend though! hopefully this weekend though!
|
SXi_Si_2002
Member
Registered: 13th May 02
Location: Southampton
User status: Offline
|
ive done the base for mine now,however i will need to change some things,got loadsa wood so thats cool, will start to build upwards after.
does much room at the ends need to be left for the carpet?
took some picks will put them up soon.
|
Mav 3000
Member
Registered: 16th Aug 01
Location: Leicestershire
User status: Offline
|
not much - about 2mm max Id say but this obviously depends on the capret. If you want it to fit tight don't leave any and squeeze it in - stops all movement if you spend time and get a great fit.
Good luck.
|
Mav 3000
Member
Registered: 16th Aug 01
Location: Leicestershire
User status: Offline
|
977 Views as I type this and only 50-odd replies! 23 comments from people and I'll be over the 1000 marker - beat that
Who thinks my amp is under-powered and who thinks the 50w will blow my alpines (30w)?? and won't be enough for my 75w Infinities?
Who'll think it will give a marked perfoamnce over my 50w HU when not blaring out at high volume - ie quality wise?
|
SXi_Si_2002
Member
Registered: 13th May 02
Location: Southampton
User status: Offline
|
Cheers mav, leaving the glue to set over night then i have a couple more supports then ill be working on the top part. first time ive done something like this so its all a bit crazy. hope it all works out in the end !
|
Mav 3000
Member
Registered: 16th Aug 01
Location: Leicestershire
User status: Offline
|
Ok Guys heres Pics form Today:
I started work on this yesterday afternoon when I got my car back from Vauxhall. I finished it today at about 6pm! It took longer cos i created a bridged Central Lcoking loom for my rear door and also had HU probs getting the damn thing back into its hole!
Heres the Pics:
Wiring Fed Through Car: RCAs and speaker cable and Cd changer RCA down the right hand side, power cable and CD changer control cable down the left (this later eliviated CD changer RCA interferance I was suffering with!):

This Is the Finished Install:


And This is the Cenceptual Model:

As you can see it looks pretty exact so Im dead chuffed.
Seats can go all the way down with the units still in, all speaker cable is uprated. phat RCAs mean HU sticks out about 5mm but this is ok as surround hides it - but its not super-secure
the front speaker wired were connected to the HU's ISO connector replacing the ones coming from the HU (used HU manual to determine which wires did what).
From this ISO block, the sound then went out down the loom to the doors. the rear speakers have lovely fat cable to flow down
the cables are bundled into a loom hidden down the side of the car. the amp is fused behind the passenger headlight. the earth is on the left behind the removable panel thats there in the boot.
Comment and qustions welcome people. Ive loved this project. Shame its over now as the MDF and fitting was fun - although it took ages!
I havent set the amp up yet. the doors are stripped cos f the central ocking prob and the loudness scared me so I'll set up the gainsmaybe one night in a remote field!
Tell me what you think! Its practical and efficiant and effective for my needs.
|
Kris TD
Member
Registered: 25th Mar 02
Location: Ware, Hertfordshire
User status: Offline
|
nice why u got the rear door cards off?
|
Mav 3000
Member
Registered: 16th Aug 01
Location: Leicestershire
User status: Offline
|
Cheers Kris.
the rear-right door central locking has broke (solenoid and wiring won't pulse it) so ive taken the wiring from the rear-left and fed from it over to the rear right door. but when i tried to test this lest week (to see if it pulsed both doors wiring) the fuse blew (think i shorted it) and then the passenger door solenoid died, then the rear-left door died in the week.
gladly the drivers one is ok (otherwise the boot is the only way in!!) and the boot solenoid was dodgy but recalibrated and is ok thank god. very worrying, getting new solenoids next weekend as there on order. will try and fix myslef to save labour charges but had the solenoids and cabling tested at Vaux yest for free! I had two spare solenoids from VPSC but one was broekn and the other was a driver one and cannot be inter-changed apparently.
|
Mav 3000
Member
Registered: 16th Aug 01
Location: Leicestershire
User status: Offline
|
BTW Kris while there off like that I was gonna dynamat them but theres hardly any good surface - the door panel has the impact bar flush onot it and then the winow regulators in the way so i didn't bother.
Was also tempted to get the filler foam out as theres a nice well asking to be filled! but i held back in fear of foam piling out of every hole!
|
willay
Moderator
Organiser: South East, National Events
Premium Member
 Registered: 10th Nov 02
Location: Roydon, Essex
User status: Offline
|
Hi mav, loved the last 3 pages of posts and pictures, really makes you want to sort your own install out! How good are you with MDF before your adventure started? And brilliant work btw.
|
Mav 3000
Member
Registered: 16th Aug 01
Location: Leicestershire
User status: Offline
|
Id never used MDF before! just went out and board a board, market out the tempate onto it, then with the help of me dad and his B&D Quattro Jagsaw, cut it out. its easy to sand too.
Hardest bit was the templates, but mine worked first time - just patience required on this. The success of it is all in the early design stages - and planning.
Thanks for the comments Willay. Tuened my amp up now - wow its brilliant. so much better than the HU alone!
|
SRi_m00k
Member
Registered: 19th Jan 03
Location: N.Ireland
User status: Offline
|
i'm mid build meself, takes a bit of time but canny wait to get it all finished!!
lotta stuff to cram into mine, 2 12" subs, 4 amps, and eq
not good
heres a few progress pics

started wi the false floor after i'd laid all the wirin, i'm ditchin me spare wheel in favour of some tire weld as i have too much kit to start an move an lift to get at spare wheel plus i need the well space. o without wheel to help suppost weight i've used 12mm mdf an strengthened wi bolsters across also to level it out
cablin used was 4 gauge power cable one set of RCA's to run to eq and speaker cabel to run to front components, old set of rca's laid down when i was doin it as spares in case of changes to system 4 gauge earth also

started to build the side profiles up, i wanted a curved shap but rather than stick 3 slabs of 18mm together an weight a lot i just cut bits out which would be seen an placed a 6mm seet on top to cover as u can see in followin pics


then just a job of sandin the top edges to a curve as desired an fittin a small piece of 6mm mdf to give a finished look to the sides an seal the gaps!!

then started on the box designs, needed to be 0.6-0.7 cubic foot, the subs are goin manget (arse) out an i wanted em at bout 60 degree angle so made a few calculations an made a mock outta card then fitted both in in 18mm mdf as they'll be puttin a bit of power down!! sealin all inner and outter edges wi gripfill/no more nails/filler etc to ensure air tight

then had to cut out the sides to allow the boxes to slide back as far as possible

both boxes secured in place

heres the most recent pic tho since this the sub holes have been cut ready for mountin , i shall try an keep u updated hope this is of some help to u chaps startin along these lines
plans are for alcantara retrim of everythin to match me door builds and a bit of lightin for the spankin diamond chrome magnets and highly polished genesis heat sinks
if anyones thinkin of this tools which are useful are, screwdrivers, screws, wood glue, gripfill, glue gun, (dremel mutli tool can be handy), drill, jigsaw, sander, leccy screwdriver etc etc allen keys
i bust me B&D sander an jigsaw ended up in woolies buyin cheapies at bout 10 quid each an they do thejob grand, mdf is a breeze wi em!!
|
the_legend_of_yrag
Member
Registered: 7th Jul 03
Location: Cambridgeshire
User status: Offline
|
Nice one lads this thread should be a sticky! Mav you not having ne subs in your install???
|
SXi_Si_2002
Member
Registered: 13th May 02
Location: Southampton
User status: Offline
|
that looks really good mate, will put some progress pics up of mine soon, a lot smaller than that mind. the first thing i have done with MDF and ive had fun doin it, gives me something to do with my four days off coz i work shifts and do 4 on 4 off so i get alto of free time when i dont have to study. keep the pics coming
|
Adam-D
Member
Registered: 11th May 02
Location: Cheshire
User status: Offline
|
loadsa time spent on those!
just need advice on mine then ill get goin
|
Mav 3000
Member
Registered: 16th Aug 01
Location: Leicestershire
User status: Offline
|
I think its good to see some installs going from start to finish - hopefully we've given some ideas and hints to others who should now go out and do the same to their cars!
I didn't fancy a sub. Ive set my system up now and the bass is ample for my needs. I don't want any cruise-mobile - I mean its a Corsa - I just wanted good sound - and Im amazed at how the amp adds to the sound quality and clarity - hearing new instruments in songs all the time! set up right it sounds good. the rear little alpines struggle but the Infinities are loving their new wattage
I don't knwo how long I spent on mine in total, but as for equipment id totally agree with M00k - the most valuable tools I found was a good jugsaw and No More Nails for me.
Your installs looks excellent mad e- good idea going for tyre weld!!
Im no ICE expert, and I know i don't have a top-spec system, but at the end of the day it does what i want, i feels its so much better than standard, does what i want, and as i listen to it to work and back it makes driving really enjoyable.
Good luck to everyone who follows in our footsteps - post pics! its good to see everyone getting in on the idea!
PS I love MDF - heavy, but fun to work with. Wiring was a pain but when you switch it on its so worth it
|
SRi_m00k
Member
Registered: 19th Jan 03
Location: N.Ireland
User status: Offline
|
yeah i didnt start off wantin a cruise mobile either but got more an more into sound quality and have ditched all my old equipment in favour of a full diamond an genesis setup, and havin watched a dvd in a mates crx, i'm now in mood for multimedia lol does this mod game ever end??
everythin i'm puttin in is aimed at SQ rather than balls out loud!!
Up front diamond 6.5" components runnin off genesis dual mono, rear fill alpine 5 1/4" comps either off HU or genesis sm100, 2 diamond m5 12" subs to be run from the genesis mini block all channelled thru an audio control eq, its took me the guts fo a year to gather all the equipment but glad to finally be started the build this is my first attempt at it but have to say its a true learnin curve an i'm enjoyin it!!
the stage where i switch it all on is comin soon an i hope to have a smile on me face like u mav!!
|
Mav 3000
Member
Registered: 16th Aug 01
Location: Leicestershire
User status: Offline
|
Totally agree - you don't half learn a lot, and when you've done and wondering what to do next, your now the proud owner of not only a nice install, but also come cool skills with power tools too
(BTW Ive opened up the thread title so everyone can add pics of their work )
|
andy hirst
Member
Registered: 18th Apr 02
Location: Rochdale, Greater Manchester
User status: Offline
|
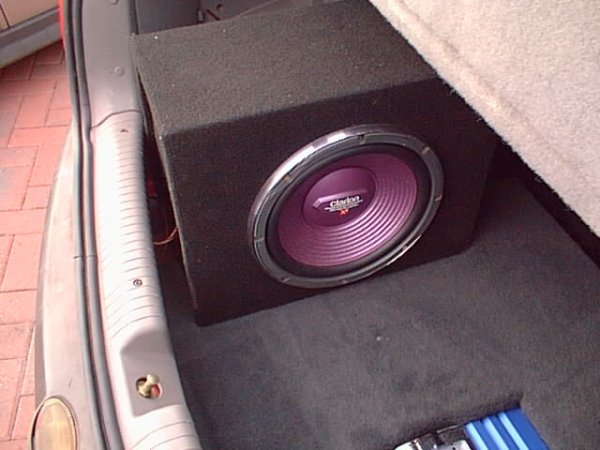
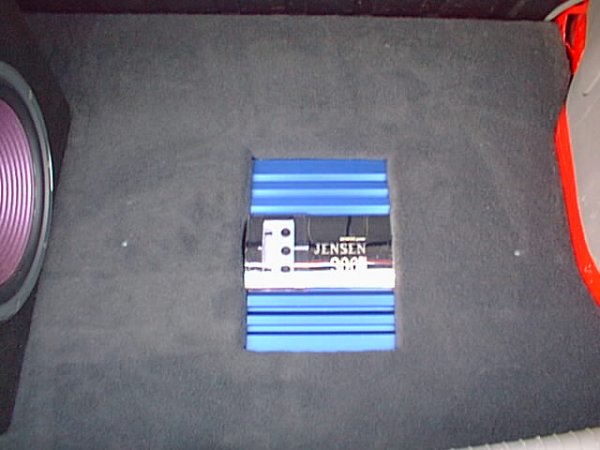
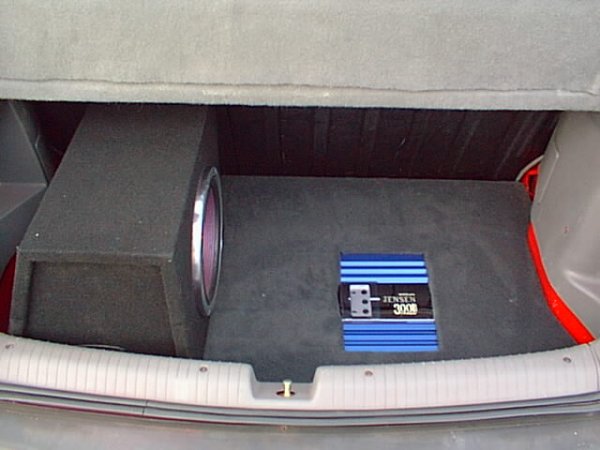
Heres mine, just sub and amp in the back, i kept the sub box because its a good one. I mounted it on blocks and used the cover(grey carpeted) to jam it in place. the grey cover is screwed into its suppoting blocks with two screws which ar not noticeable.

|


