jr
Member
Registered: 20th May 02
Location: Kent
User status: Offline
|
quote="Jelly"]With a few Mk1 track and race cars flying about and in the making, how about a thread devoted to showing your car and the work you've done.
I'll start with mine. I'm currently building a Mk1 Golf for track and race use. My main area i'm concentrating on at the moment is weight loss. I am keeping the original 1600 engine, albeit with work done to it.
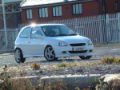
This was how the car looked in June of this year.

First are i got to work on was the doors. Got them down from 22kg (without cards) to 10kg. Still a few areas I'm going to remove still so hopefully can dip below 10kg.


Engine came out before the major strip down started.

...then the strip down took place.

The sound deadening on the floor / footwells had to come off. After getting it all off it weighed 8kg in total.


Next area to play with was the front inner wings. The underseal on them was very thick in some areas. I used a wire grinder attachment to get it off.


Once all the crap had been removed, I got hold of a holesaw. Then the fun started. The jigsaw came next.


I have since taken much more off than that on both sides. I will get some current pics today hopefully.
Jelly


[quote="Jelly"]Update time!
Yesterdays (Feb 6th) work was spraying the rear arches and welding the seat bracket and harness bolts in place. The cage section in the engine bay was also sprayed red and the left over section inside sprayed black.


A nice welding shot :happy:

The bolt plates are put in with the bolts downwards to stop them being pulled out under heavy load.


The finished welding. The seat brackets are thick walled rectangular box steel to provide a strong mount that won't flex.

The finished cage all painted.

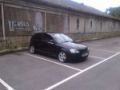
Today I'm happy. The car is finally home. Was up early to get it ready for the trailer.


Jelly
I'm using a 2L 9a valver now 


As the engine was.


Primed rocker cover.

First black layer.

And fitted.


New bonnet hinges I made. Both aluminium and weigh about 30g each, The original steel ones weigh 350g.


The white areas are where the new gear lever needs to be.


The pile of wires that I removed. These were:
Rear window heater
Rear washer/ wiper
Heated rear window switch (to fusebox)
All stereo wires


The insert should line up with the white line.

The hole you see should be straight, as you can see it isn't.


10 easy steps on how to build an upright.
Step 1: The hub or wotever you call it.

Step 2: Take one coilover.

Step 3: Mount coilover to hub thingy.

Step 4: Make sure coilover bolts are nice and tight.

Step 5: A brake disc.

Step 6: Attach shiney new brake disc.

Step 7: Remove new roller bearing top mount from sealed bag.

Step 8: Attach roller bearing top mount to coilover.

Step 9: Mount caliper carrier to hub thingy whilst pulling stupid face.

Step 10: Admire a rebuilt upright. All that is needed now is a brake caliper and a car.


Jelly
I'll let the pics do the talking...


Engine in...


My mate Vinnie who has helped out loads through the project. Big thanks to him...

Me being a big kid and wanting to play with my unfinished toy :happy:...


I sanded and repainted the driveshafts, just to get rid of the surface rust.


I fitted the driveshafts this morning and set some nice negative camber whilst I had the wheels off. Just for the mo though, until I set the car up properly. Setting that much camber had obvious effects on the tracking, causing considerable toe-in. I straightened it up (by eye).


Next was to get the head back on. The new gasket was lined up first. An easy task with the two locating pins on the top of the block. I then lifted the head into postion, again using the locating pins to line up. It was all done a lot easier whilst standing in the engine bay and saved me buggering my back up.

Head with new head gasket:

The gasket lined up:

The new 'stretch' head bolts:

Lifting the head into position:

The head bolts were then put into the holes and screwed just short of finger tight:

I then went around the underside of the head making sure the head and gasket sat flush on the block all round:

Next I torqued up the head bolts, in sequence and in four stages:

The final thing to do was to put the cam cover back on:

Et voila. I'm spending far too much time in my garage lol

Jelly


I also fitted the new cam belt as well.

Next, the carbs went on. I've taken the pancake filters off because I think they may cause pulse problems within the venturi, so I'm going to get trumpets instead.


I then played about with the oil cooler postioning. I had thought of using the first example, in the offside wing, but I think having it in the opening vent in the front panel is the best bet.


I started installing the fuel pipe next. I did route it through the bulkhead on the nearside at first, but found a better location on the offside. I modified a blank bulkhead grommet to put the pipe through. I then had to drill the nice new paint lol, to make a hole to fit the fuel pressure regulator bracket. Once this was done, I cut the fuel pipe to the required lengths. The cuts were made at the carbs, the T piece and the fuel pressure regulator.


[quote="Jelly"]More more more! 
Taa daa ...i now have a windscreen. Which is really annoying because I keep punching it trying to lean inside.


Jelly
[quote="Jelly"]Right, time for updates from the weekend. I decided to fit the front Weitecs and the front spoiler on sunday. Pics tell a thousand words as usual


Yes, thats my dad...

Monday morning I got the rear suspension on with the help of Polabear and Tris...


Looks kind of Dodge Charger like now...

We do sometimes have to worry about these guys. If you see them at meets stay well clear...


Jelly
[Edited on 21-05-2006 by jr]
|
Robin
Premium Member
 Registered: 7th Jan 04
Location: Northants Drives: Clio 182 Cup
User status: Offline
|
Broadband warning?
|
Martin_C
Member
Registered: 27th Jun 03
Location: Ayrshire, Scotland
User status: Offline
|
56k warning.
no sorry, 512k warning 
|
Ry_B
Banned
Registered: 1st Dec 05
Location: Solihull, W Mids Drives: 45BHP beast!
User status: Offline
|
512k warning needed! 
|
Butler
Member
Registered: 2nd Jun 05
Location: London
User status: Offline
|
its not finished 
|
big eck
Member
Registered: 20th Apr 03
Location: Tullibody. Drives - Audi B8 S4 & Fiesta Zetec-S
User status: Offline
|
the pics dont work either
|
Marc
Member
Registered: 11th Aug 02
Location: York
User status: Offline
|
Love Mk1 Golfs 
|
Ian
Site Administrator
 Registered: 28th Aug 99
Location: Liverpool
User status: Online
|
Imageshack hosting is so crap, tell these people to get CS garages or something, it would be here by now.
|
jr
Member
Registered: 20th May 02
Location: Kent
User status: Offline
|
at ian
all the pics work for me eck 
|
Robin
Premium Member
Registered: 7th Jan 04
Location: Northants Drives: Clio 182 Cup
User status: Offline
|
James, whats the original post? i cba to wait in here anymore
|
L30 SCT
Member
Registered: 27th Nov 05
Location: aberdeen
User status: Offline
|
you cant just not show us it finished.
more pics
|
JadeM
Premium Member
 Registered: 9th Feb 06
User status: Offline
|
Impressive stuff
|
mwg
Member
Registered: 19th Feb 04
Location: South Lakes
User status: Offline
|
Defo Broadband warning
Looks like a cool project from the pics I could see that had loaded.
Weight loss taken to the extreme
|
Liam
Member
Registered: 19th Jan 06
Location: Stafford
User status: Offline
|
took ages to load with 2mb connection 
|
willay
Moderator
Organiser: South East, National Events
Premium Member
 Registered: 10th Nov 02
Location: Roydon, Essex
User status: Offline
|
i really like that, the engine looks like its mounted backwards, is that standard or something hes hacked up while making this lovely project?
I love the amount of detail thats gone into this, its really really cool.
|
Robin
Premium Member
Registered: 7th Jan 04
Location: Northants Drives: Clio 182 Cup
User status: Offline
|
stil loading for me. 33 mins so far
i'm on a 576mbps connection too
|
Doug
Member
Registered: 8th Oct 03
User status: Offline
|
Want to see it finished
|
ed
Member
Registered: 10th Sep 03
User status: Offline
|
I'm getting a Mk1 Golf soon...
|
Doug
Member
Registered: 8th Oct 03
User status: Offline
|
I dare someone to quote all the pictures
|
ed
Member
Registered: 10th Sep 03
User status: Offline
|
quote:
Originally posted by willay
i really like that, the engine looks like its mounted backwards, is that standard or something hes hacked up while making this lovely project?
I love the amount of detail thats gone into this, its really really cool.
That engine is the right way round, it's Vauxhall engines that are the wrong way round
Na, it's just the way some engines are designed...
|
PaulW
Member
Registered: 26th Jan 03
Location: Atherton, Greater Manchester
User status: Offline
|
even on my 10meg imageshack timed out the pics half way on the first pass, then on the second the only one timed out was the last
still bloody impressive!
|
mav
Member
Registered: 19th Jun 01
Location: Scotland
User status: Offline
|
1/2 the pics are red crosses forme, looks like an awesome project though..
red crosses gone and all working...amazing...
[Edited on 21-05-2006 by mav]
|
L30 SCT
Member
Registered: 27th Nov 05
Location: aberdeen
User status: Offline
|
it didnt take long at all on my computer
|
Robin
Premium Member
Registered: 7th Jan 04
Location: Northants Drives: Clio 182 Cup
User status: Offline
|
mav, try refreshing it 5 times. that worked for me
|
Sly_SRi
Premium Member
 Registered: 9th Apr 04
Location: Reading, UK Drives: Corsa C
User status: Offline
|
chain driven twin cam, don't see that very often
Corsa C Z20Let
Black Sleeper Turbo Project
|


