Tim
Site Administrator
 Registered: 21st Apr 00
User status: Offline
|
Main write-up: Tiger
Additional notes: Tim
Power Capacitors for Car Audio Systems
By adding a power capacitor to you car audio system you increase the transient response, the bass punch and the life of your amplifier.
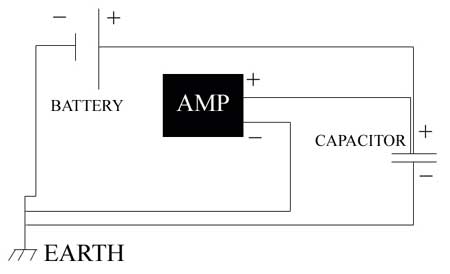
Every time the bass drops and you have your stereo turned up the battery cannot supply the power required by the amplifier therefore it may clip and not give you the full potential of your install. The capacitor when wired in parallel with your battery (and amplifier) will give you up to 50% more output on those demanding bass notes.
Another benefit of having a power capacitor as part of your install is to reduce volt drop. Long runs of cable all create volt drop and your cable is generally ran from the engine bay to the boot so ideally the capacitor should be located as close to the amplifier as possible.
You will need to get roughly the right size capacitor for the size of your install too, heres a guide:
500 watts or less = 0.5 farad
500-1000w = 1 farad
1000w-1500w = 1.5 farad
2000w or more = 2 farad
If you cant find a 2 farad capacitor (which you generally may struggle to) you can always run 2 x 1 farad capacitors in parallel.
Three-terminal capacitors
Most car audio capacitors are two-terminal (+/-), but some (mainly ones with displays) will have a 3rd terminal on them. This is for a REMOTE LEAD (like any amplifier) which enables the display when the head-unit is turned on. Simply run a cable from your amplifier REM connection to the capacitor REM connection when you install. This is designed to save draining the battery while the install is not in operation.
Do not worry if your capactitor has a display, but only two terminals! These capacitors auto-sense eletrical activity within the car, and if there is none, they turn off after a few minutes. This is how 'Directed Audio' capacitors operate.
Handling Tips
Charging and discharging capacitors are areas you should take care with.
A 1.0 farad capacitor contains a huge amount of energy when charged and could quite easily cause you a great shock and an amazing amount of discomfort if you touched across the terminals with your hand or by creating a dead short between them.
When charging DO NOT connect a 12vdc supply directly to the terminals always connect the battery up last and always use the charging resistor that should be supplied or alternatively use a 12v lamp across the terminals while charging. When disconnecting a capacitor from the circuit, a resistor should be connected to discharge the capacitor for at least an hour before it becomes safe to handle. (caution the resistor may become warm during this process)
A dead short across the terminals may cause the capacitor to explode or cause unrepairable damage to the capacitor.
Always install a fuse or circuit breaker between the + battery terminal and the + terminal of your capacitor as close to the battery as possible
Always follow the instructions supplied and take care to make precautions to avoid injury.
[Edited on 24-02-2003 by Tim]
|


