|
|
scoob
|
posted on 24th Jan 07 at 00:19 |
very nice, if u dont have a spare the AA will not help u i learnt the hard way lol
|
GavCorsa
|
posted on 23rd Jan 07 at 23:41 |
Sounds very good, as with most cars it is better inside when doors/boot closed
spare wheel?? u havin a laugh
AA r there when i need that
and yes if u look rear lights r accessable, i did think about that on both of the installs i did
|
jammo20
|
posted on 23rd Jan 07 at 23:11 |
looks good mate i bet it weighs a fair bit lol
|
Wonderboy
|
posted on 23rd Jan 07 at 23:11 |
Oh and other thing :P,
I'm guessing there is no access to the spare tyre ?
What about the rear lights ?
|
Cupra Steve
|
posted on 23rd Jan 07 at 22:26 |
tidy looking job. what are those d12's like???
|
GavCorsa
|
posted on 23rd Jan 07 at 22:12 |
quote:
Originally posted by --Rikki--
wheel brace is good too but... where is the jack? i made my install with a removable panel to get to the spare wheel/tools put shopping etc
wheel brace there for when neede, i pay the AA enough to take me home so no need for a jack
quote:
Originally posted by Wonderboy
Are you going to fit the alarm system by yourself ? Do you mind me asking how much you payed for it ?
Na mate, pic was of the box after it was fitted, £380 all in
|
ed
|
posted on 23rd Jan 07 at 21:44 |
You've done a damn good job there :cool:
|
dan_m1les
|
posted on 23rd Jan 07 at 21:38 |
was going to say need 2 matching amps. . . you already ordered one :D
|
Wonderboy
|
posted on 23rd Jan 07 at 21:19 |
Really good job there, looks like you know how to work with wood pretty well :look:
The install looks great, good work. The pictures look much better which were taken with the camera :)
Are you going to fit the alarm system by yourself ? Do you mind me asking how much you payed for it ?
|
RKS
|
posted on 23rd Jan 07 at 21:19 |
thats really good mate! am liking where you have mounted the rear speakers and power cap. seats out installs are ace :) the only thing that i would have done differently would have been removed the corsa plastics either side of the boot and the rear qtr panels
wheel brace is good too but... where is the jack? i made my install with a removable panel to get to the spare wheel/tools put shopping etc
|
Robbo_Corsa
|
posted on 23rd Jan 07 at 21:02 |
:!:! Love it! Wish i could do something like this with mine!
Wish i could get someone to do it instead actually! :lol:
|
Marc
|
posted on 23rd Jan 07 at 20:42 |
I think you've done a really good job! :thumbs:
|
Ben G
|
posted on 23rd Jan 07 at 20:40 |
now them pics look so much better :)
|
M2RTY
|
posted on 23rd Jan 07 at 20:37 |
love the wheel brace!
|
GavCorsa
|
posted on 23rd Jan 07 at 20:17 |
yeh i know, want a proper cam just keep spending money on the car instead
A mate took these with his cam tho


|
Ben G
|
posted on 23rd Jan 07 at 20:11 |
looks very nice. maybe invest in an actual camera though? will make your work look so much better than a crap mobile camera. :)
|
GavCorsa
|
posted on 23rd Jan 07 at 20:03 |
quote:
Originally posted by Cosmo
is the material two different colours?
Looks good though, top work :thumbs:
Na, just the light shining on it at different angle, makes it look lighter sometimes, not best at covering but then i aint an upholsterer :|
|
GavCorsa
|
posted on 23rd Jan 07 at 20:00 |
pics of the screen thats goin in 1 way or another
started as a normal screen, read on the back it was a 12v DC screen:lol:
no power converter needed which is even better

started pulling it apart to see what wasn't needed, took out the speakers and the mounts for the stand

then started makin the frame for it


Then started covering the frame in same material as boot install

And mounted the switches onto the bottom corner

Then hooked it up to my PC to check it still worked and see what it looked like

Now i just need to work out where to mount it and get the wiring in
|
Cosmo
|
posted on 23rd Jan 07 at 19:57 |
is the material two different colours?
Looks good though, top work :thumbs:
|
GavCorsa
|
posted on 23rd Jan 07 at 19:46 |
life started like this in the boot of my car

I then went on to doing my first boot build

One nite i decided, no g/f, no kids, don't do loads of shopping so don't need any space in rear of car, next moring i got to work, stripped the whole rear of car

car was quite bit faster after all that weight taken out, but i knew what i wanted so carried on, next was the floor for everything to be mounted on

then spent ages trying to work out where i wanted the subs to be, finally got it and mounted boxes to the floor and started work on the surrounding area

Section for subs all done, which included front bit where power cap will be mounted, the position of the rear speakers came to me later on

won a job lot of these in the mean time, knew i'd need a few anyway

Bought a new power cap too, along with good few meters of 4awg earth and power cable which was needed for all the wiring

next was the section for the amps, nice easy square section, well i thought it was easy, still took awhile workin out how i wanted it

Next i made the bits for the rear speakers

Then i sorted out loads of wiring, power, earth and rca's, also did wiring for power cap and for fused distribution block, also added section to front to finish/hide/blend into car


Then i started making all the bits to blend into the sides of the car, took ages !!

After the whole thing was finished it needed sanding down, sanded all the square edges to be bit rounder ready for covering

All sanded down, wiped down the whole install and ready for covering

Next came the covering, had to dismantel most of the install to cover certain parts, few pics of bits while covering them


Then i went onto covering the rest of the install and mounting few bits


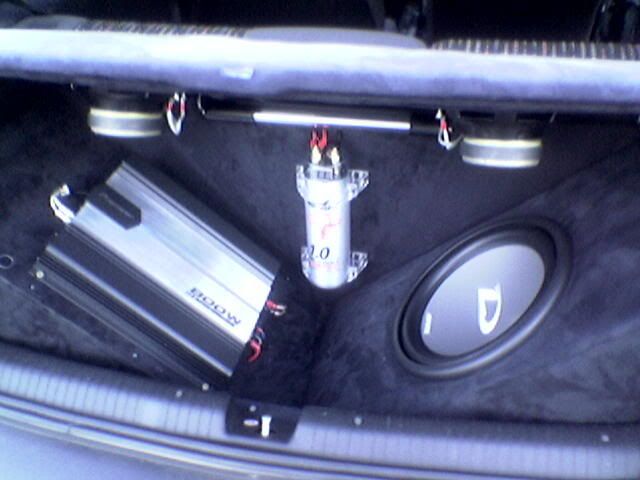
Next was subs and amps, and putting main fuse back in after 6 weeks with no bass


Then i got this, thought it's best to help protect my car

Basically done now, just need perspex cover over the amps, happy it's all done now
That was all done about 3 months ago, i now have another matching Alpine amp on the way and a 17" TFT screen to put in the rear somewhere
|


