|
|
Gary
|
posted on 30th Apr 11 at 19:14 |
Bit of decorators caulk should fill the gaps nicely. Prob wouldn't need to tape after caulking it up too.
|
AndyKent
|
posted on 30th Apr 11 at 18:12 |
Meh, already had the MDF from another planned project.
|
Fad
|
posted on 30th Apr 11 at 13:39 |
Should have got plasterboard section and screwed them to the studs and noggins with counter sunk screws and skrimmed/taped the edges.
[Edited on 30-04-2011 by Fad]
|
AndyKent
|
posted on 30th Apr 11 at 12:48 |
Sounds fine, I bet plastering would end up a right mess anyway :lol:
Would you fill/prep the joints at all or just tape and cover?
|
Gary
|
posted on 30th Apr 11 at 11:50 |
Tape the joins then lining paper.
I wouldnt want to plaster MDF, infact i dont think you can (without teh chance of the whole thing fucking up)
|
AndyKent
|
posted on 29th Apr 11 at 19:52 |
I'm covering the whole thing in MDF and then either plastering or lining papering the whole thing - not sure which yet.
Main face is to be split into 4 parts leaving a hole in the middle for access if need be. Also allows a bit of the depth of the wall mount to be taken up in the MDF.
Got the left right and top pieces fully cut and screwed in place this afternoon.
Bit awkward since the sloping ceiling isn't level, but a bit of planing here and there sorted it.
Still to do:
- finish framing up media centre box
- cut 4th mdf panel including hole for accessing power/cabling
- old chimney wall is far from level so need two more MDF panels for each side of my build to take up any gaps
Then plaster/line and decorate.
|
AndyKent
|
posted on 29th Apr 11 at 19:40 |
Made some good progress today.
Got ply support plates cut and glued into position, roughly where I'm going to mount my shelf. Only glued in, but they're only meant to give something for a screw to bite into rather than just MDF.

Also got noggins in to provide some extra strength top and bottom.
|
AndyKent
|
posted on 28th Apr 11 at 22:11 |
37C580, so pretty much :)
|
A2H GO
|
posted on 28th Apr 11 at 21:38 |
Same TV as me I think, Sammy 40C580?
|
AndyKent
|
posted on 28th Apr 11 at 20:43 |
quote:
Originally posted by Daniel_Corsa
How can you work in that mess! Look forward to seeing it done! Not long finished mine!
God knows :lol:
Its all cleared up and hoovered now the most of the messy work is done.
|
AndyKent
|
posted on 28th Apr 11 at 20:40 |
Only had a little time yesterday, so got the outer two studs screwed into place. Bit awkward since the switched spur (shown in one of the above images) was really awkwardly placed.
In an ideal world I wanted to keep full access to it, but I also needed to make sure the boxed recess was completely covered. If I missed the spur, I'd end up not covering the recess. Balls.
To get round it I've partly overlapped the spur, but cut the stud so that the plate can still be taken off. I also reversed the plate so the switch and fuse are fully accessible regardless.
Had a fun packed day today so didn't get anything done on it.....more progress tomorrow whilst I'm avoiding the wedding :lol:
|
Daniel_Corsa
|
posted on 28th Apr 11 at 20:37 |
How can you work in that mess! Look forward to seeing it done! Not long finished mine!
|
AndyKent
|
posted on 28th Apr 11 at 20:35 |
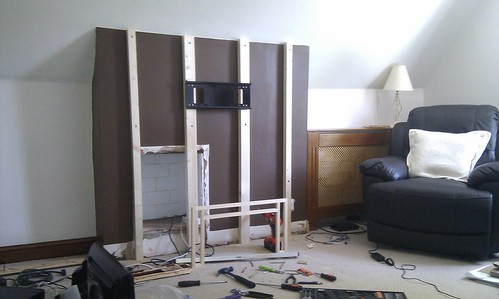
That evening started framing up the media box. Had drawn out a 1:1 scale model in autocad, so printed a copy and build over the top. Useful for keeping everything square and quick to take off dimensions. Got it all glued together. There will be two of these (one front, one back), with 300mm bars linking it all together.

|
AndyKent
|
posted on 28th Apr 11 at 20:29 |
On a slight comedy note, managed to use pretty much every single piece of DIY equipment I own :lol:
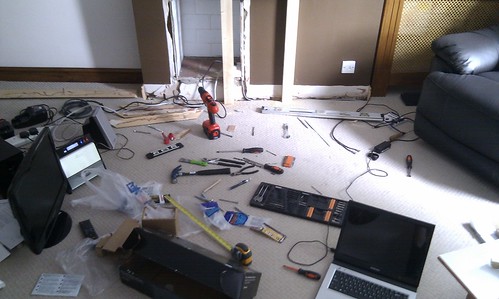
Don't know how or why, just sort of quickly accumulated on the floor :lol:
|
AndyKent
|
posted on 28th Apr 11 at 20:25 |
Went and bought materials last weekend and had this week off to do the work. Been ill for most of it :mad: but still made some progress.....
Ripped out all the existing skirtings and architraves. Proper bodge job by whoever put them in, Massive holes everywhere like they'd had a go and changed their mind, and a gallon or two of no more nails :lol:
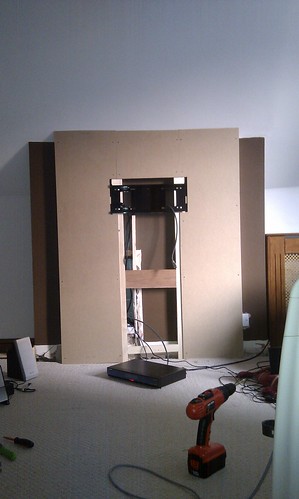
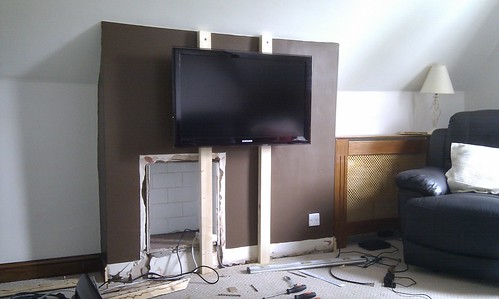
Got the two main studs cut to size and in. Masonry screws into chimney (which was a bitch with solid 100 year old stone) top middle and bottom. Wall mounting plate is screwed into the studs (behind the TV, visible later) and then TV hung on top. Double checked at this stage to make sure it wasn't going to fall over :lol:
Mounted it a little higher than my original model as I thought it looked better.
I'm planning on retaining the boxed recess for housing power leads and cabling out of site so didn't bother stripping the tiling and stuff out. You'll have just about enough room to get your arm in to plug/unplug stuff when its all finished.
[Edited on 28-04-2011 by AndyKent]
|
AndyKent
|
posted on 28th Apr 11 at 20:18 |
Don't know if anyones interested in seeing a few pictures of my small build to wall mount my TV in my living room.
To cut a long story short, I'm in a top floor flat in a converted Victorian house. Theres two chimneys running up through the house, one in the bedroom at the back, and another in the living room at the front. Theres no fireplace, since I'm partially in the roof space, but the breast runs through.
It started out looking like this:
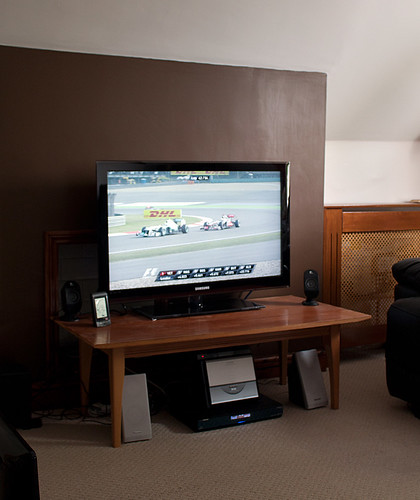
Crap pic, sorry - haven't got one of the chimney without all the junk in front. I left the coffee table there since I moved in, was never meant to be permanent hence not worrying about wires and stuff :lol:
Its clearer modelled in sketchup:

You can just about see the recessed box in the breast behind. I've no idea what or why it was put there, but I don't like it being off centre and it sat too tall to sensibly mount the TV. I could have wall mounted the TV above (just about) but didn't want all the wiring showing obviously. The easier thing to do was to just cover the whole thing with a new stud partition. Benefit of this is also that I could design something to my taste and put some design effort into it.
Modelled the area in 3D in sketchup to come up with some ideas. Had three designs in mind, but in the end went for this:
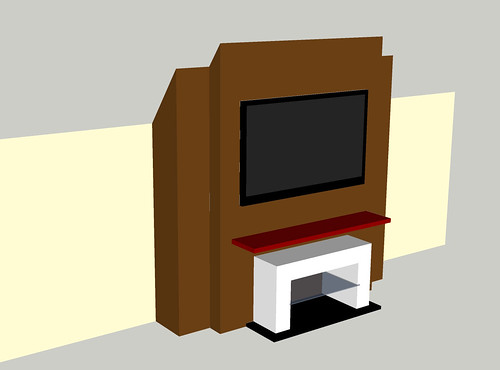
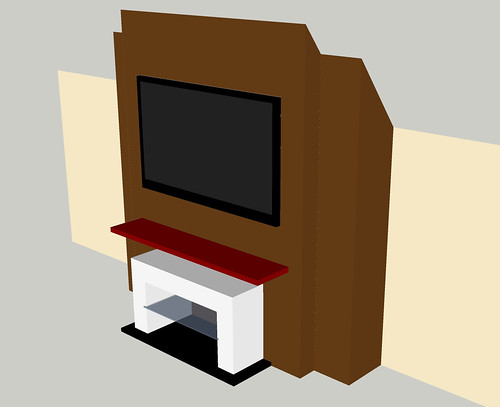
So, stud out a frame narrower than the existing chimney to mount the TV on, custom white media centre storage unit sat on a piece of dark stone (granite/marble? not decided yet) and a red glossed floating shelf.
|


