taylor2008
Member
Registered: 3rd Nov 08
Location: wolverhampton
User status: Offline
|
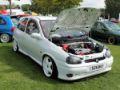
brought a corsa sri fitted with a c20xe APPARANTLY A 2.1
 RUNNING ABOUT 185BHP no proof of this at the moment. RUNNING ABOUT 185BHP no proof of this at the moment.
spec of the car as i was told,
2.1 16v dizzy type engine with f20 gearbox
*Bilstein suspension
*Powerflex bushes all round
*Speedline allessio's with good yokohoma s-drives
*2.0 brakes and pads with goodridge braided hoses
*straight through 2 1/2in pipe to a 3in rolled in backbox
*FSE Power boost valve
*B+M Shortshift link
*Astra GTE Digi Dash all singing and dancing
*Powercap
*k & n filter
*Non power steering rack
*Uprated hoses
*Clifford G5 alarm and immobiliser
Interior of this car is faultless with no rips or burns or trim missing.
Engine was converted in 2005 and then taken out and fully rebuilt in january of this year and has covered no more than 2500 miles since.
Just had fitted new front hubs(chris astley motorsport), wheel bearings, track rod ends, bottom ball joints and outer cv joints and gaiters. Had 4 wheel laser alignment the weekend and is driving like new.
The only faults are the pin broke in the ignition barrell this week so im starting it off the blackbox. Steering lock still works. And the fan has stopped working but i have replaced the fan switch and thats not the problem but fan can be seen running so i'd say it may be the relay. And last of all the drivers window has fell off the mechanism towards the front of the window but is still on rear so wont drop and can still be used.
since haveing brought the car i have done all of the jobs that need'd to be done,
fixed the drivers side window, had bent all the bars inside somehow
fix the fan for now anyway, just bridged the wire.
the ignition was the worst vauxhall wanted £35 for the ignition switch , not a chance was i paying that, local scrappy and a empty pocket solved 
igntion barrel cost me £20 from scrappy happy with that price.
brought a new battery 2day as the old one was dyeing and wasnt working the didgi dash proply
the same weekend i decided to lower the rear of the car a fraction on the rear as i wasnt happy, so off came the 40mm rear springs ond on with the new 60mm, and then gave it a good clean inside and out. currently decideing weather to put 60mm on the fronts
following weeknd i went out and brought a gsi sideskirt and arch's , to find out wen i got home all the mounting clips and beein cut off the side skirts wasnt happy, so then this weeknd went to local srappy to in suprise there it was waiting for me to strip her wasnt happy, so then this weeknd went to local srappy to in suprise there it was waiting for me to strip her a full corsa gsi complete in mint condition of off they came and into the van . a full corsa gsi complete in mint condition of off they came and into the van .
mods that will be takeing place will be the following
standard gsi alloys podwercoated, unsure on what colour.
coilovers
new back box 3.5 '' rolled out wards
gsi sideskirts and arch's
new bonnet as rust apearing on top
that will be it for now
[img] [/img] [/img]
[img] [/img] [/img]
[img] [/img] [/img]
[img] [/img] [/img]
[img] [/img] [/img]
gsi kit currently bein prepd ready for spraying and fitting, slightly better condition than the one fitted, should all be going on before trax,
[img] [/img] [/img]
[img] [/img] [/img]
[Edited on 25-08-2009 by taylor2008]
[Edited on 25-08-2009 by taylor2008]
[Edited on 25-08-2009 by taylor2008]
[Edited on 25-08-2009 by taylor2008]
[Edited on 25-08-2009 by taylor2008]
[Edited on 26-08-2009 by taylor2008]
[Edited on 28-08-2009 by taylor2008]
[Edited on 03-09-2009 by taylor2008]
[Edited on 07-09-2009 by taylor2008]
[Edited on 26-09-2009 by taylor2008]
[Edited on 01-10-2009 by taylor2008]
[Edited on 12-10-2009 by taylor2008]
[Edited on 22-11-2009 by taylor2008]
[Edited on 20-12-2009 by taylor2008]
[Edited on 20-12-2009 by taylor2008]
[Edited on 28-12-2009 by taylor2008]
[Edited on 03-01-2010 by taylor2008]
[Edited on 17-01-2010 by taylor2008]
[Edited on 22-01-2010 by taylor2008]
[Edited on 25-01-2010 by taylor2008]
[Edited on 30-01-2010 by taylor2008]
[Edited on 31-01-2010 by taylor2008]
[Edited on 17-02-2010 by taylor2008]
[Edited on 22-02-2010 by taylor2008]
[Edited on 07-03-2010 by taylor2008]
[Edited on 24-03-2010 by taylor2008]
[Edited on 28-03-2010 by taylor2008]
[Edited on 28-03-2010 by taylor2008]
[Edited on 11-04-2010 by taylor2008]
[Edited on 28-04-2010 by taylor2008]
[Edited on 04-05-2010 by taylor2008]
[Edited on 12-05-2010 by taylor2008]
[Edited on 23-05-2010 by taylor2008]
[Edited on 05-07-2010 by taylor2008]
[Edited on 26-09-2010 by taylor2008]
[Edited on 26-09-2010 by taylor2008]
|
taylor2008
Member
Registered: 3rd Nov 08
Location: wolverhampton
User status: Offline
|
car has now bein booked in to be rolling road'd and set up will be going in on 24th this month
all so will be collecting my gsi alloys tomora will get pics up soon as
[img] [/img] [/img]
[img] [/img] [/img]
[Edited on 25-08-2009 by taylor2008]
|
taylor2008
Member
Registered: 3rd Nov 08
Location: wolverhampton
User status: Offline
|
time to do some work and try and get it ready for trax show, new wheels, new body kit and rr setup
so i started the jobs today , first of all was to get to the paint shop and brought
1ltr carabic blue for body kit
1ltr anthercite greay for wheels
1ltr thinners
1ltr plastic primer
1ltr laquer
1 tub body filler
1 tub fiber glass
got home and first fing to do was start rubbing down the body kit once rubbed it all down had to repair the front driver side crack , , so got the grinder out and ground the back of the bumper so the fiber glass would bond better, once it had gone off,added filler to the oposite side then sand it down to get smooth finish, i finally finishd danding down the whole kit, so then got the compresser out and primerd it all up ready for painting in the morning 3 coats on each of primer
after that i decided that i was going to start on referbing my x5 gsi alloys, tyers were taken off in the week, gave them a good wash remove all the grease from blown cv joints wat a mess, so then after that i started the sanding down again anf fillering were was need'd. wat a mess, so then after that i started the sanding down again anf fillering were was need'd.
thats if for now untill 2mora will add pic tomora once kit is sprayed and possably wheels
[img] [/img] [/img]
fiber glass on the back
[img] [/img] [/img]
filler on the front sand'd down
[img] [/img] [/img]
[img] [/img] [/img]
[img] [/img] [/img]
[img] [/img] [/img]
[Edited on 25-08-2009 by taylor2008]
|
taylor2008
Member
Registered: 3rd Nov 08
Location: wolverhampton
User status: Offline
|
right to day the car was booked in for 10.00 am at high tech motorsport to be rr'd and checkd over
he done compression test on all 4 piston's and all were spot on
then checkd plugs leads and were all spot on again then it was time to go on the rr and to see weather it was actualy a 2.1 as the previos onwer sed, and geuss what he was wrong wat a knob he is i was pist off tbh, but with 3 runs all at 5800 rpm 157 bhp on evry run i was happy with this and the mekanic was too ''sayin that its a good strong engine and bein looked after well''
though out the rr there was only one problem he found, there is no live running to the airflow sensor so he gave us a number of his friend to give a call he's a auto ellectrition, so he will be round soon.
then when i got home i then went up to my local scrap yard and where i had my gsi kit off it still had the orginal gsi interior in mint condition no rips burns fads ect, left in out so i counted my pennys and out it came with the best part of 2/3 hours removeing the seats/door cards ect as the floor had gone all rottern under neith so then the outer bolts on the sum frame had gone rock solled so hamer and chissel to the rescue chissled a big hole in the floor to remove them, then got home removed my old interior and then fitted the gsi seats.
more pics to follow
|
dan-sport
Member
Registered: 9th Oct 07
Location: Bushbury, West Midlands
User status: Offline
|
sounds good mate will be worth a look at the next cs meet
|
taylor2008
Member
Registered: 3rd Nov 08
Location: wolverhampton
User status: Offline
|
wheel referb and primer body kit with plastic primer and cheep base coat, then wet and dry the bumpers ect then sprayed in colour reli pleased with the out come just a few pics
tyers removed
[img] [/img] [/img]
rub down and spray in eitch primer
[img] [/img] [/img]
time for colour
[img] [/img] [/img]
still needs to be laquer'd
[img] [/img] [/img]
body kit in grey primer just before re=spray in carabic blue
[img] [/img] [/img]
[img] [/img] [/img]
thats it untill 2mora
|
shaunmods
Premium Member
 Registered: 12th Mar 07
Location: Glascote, Staffordshire
User status: Offline
|
Top work there so far mate. Really like the wheel colour
|
taylor2008
Member
Registered: 3rd Nov 08
Location: wolverhampton
User status: Offline
|
quote:
Originally posted by shaunmods
Top work there so far mate. Really like the wheel colour
cheers its a shit camera so it aint given the full colour proply plus the wheel still needs to be laquerd, will have loads more pics 2mora hopefully
|
cayenne15
Premium Member
Registered: 28th Sep 08
Location: Cheslyn Hay, Staffordshire
User status: Offline
|
good updates mate! looking forward to seeing this!!
|
taylor2008
Member
Registered: 3rd Nov 08
Location: wolverhampton
User status: Offline
|
right todays update~~
first thing to do was go and get some more primer had ran out so off i went and brought primer tigel seal and 2k laquer didnt have much left.
then when i got home i cracked on with my wheels as i still hadnt finishd them so i wet and dry them then, then primer, while the primer is drying i decide'd to build my front bumper back up, splitter fogs ect, once that was done i went back to my wheels and wet and dry again then time for some colour base coat on the under side let it dry and repeat 3 times, then flip over and do the main side same again repeat 3 times again, once they had gone off in came the rear bumper and front arch's, coat them in primer and let them dry then wet and dry all over, then while i was awaiting them to dry i decide'd to fit my bumper so it woudnt get knockd about will be comeing off again in the next couple days, will then fit the rest of the kit,
all 4 wheels are done and center caps, there going tomorrow to have 4 bran new low pro's on them
pics to come
|
taylor2008
Member
Registered: 3rd Nov 08
Location: wolverhampton
User status: Offline
|
[img] [/img] [/img]
one complete wheel
[img] [/img] [/img]
finished painting
[img] [/img] [/img]
all pats added
[img] [/img] [/img]
rear arch's
[img] [/img] [/img]
fitted front bumper
[img] [/img] [/img]
rear bumper and front arch's in primer
[img] [/img] [/img]
[img] [/img] [/img]
gsi interior that cost £20 bargin
[img] [/img] [/img]
[img] [/img] [/img]
[img] [/img] [/img]
|
Nic Barnes
Member
Registered: 5th Apr 04
Location: nowhere near ginger people
User status: Offline
|
looks great
|
DannyB
Premium Member
 Registered: 6th Feb 08
User status: Offline
|
Great job on the spraying!
|
pagey
Member
Registered: 30th Nov 04
User status: Offline
|
Impressed with all the paintwork buddy, once done have to get sum pics together as theyl look similar with the wheels n kit on! looks much better than when you bought it anyway, and good results at the rr as well made good power by the looks of it 
|
cayenne15
Premium Member
Registered: 28th Sep 08
Location: Cheslyn Hay, Staffordshire
User status: Offline
|
looks soo nice mate
|
FruitBooTeR
Member
Registered: 18th Jan 07
Location: Wolverhampton Drives: S15
User status: Offline
|
Good progress mate!
If I had known you were that good at spraying I would have gave my corsa to you to spray
|
taylor2008
Member
Registered: 3rd Nov 08
Location: wolverhampton
User status: Offline
|
little up date~~~
finished spraying the rear bumper/ sideskirts/ front arch'es all ready for fitting tomora as well as the rest of the kit
taken the speedlines off today as they have bein sold car is currently on bricks at the moment
while the wheels have bein taken off i decide'd to spray the rear brake drums the same colour as my wheels, and i gave the front calipers and shocks a clean too came up realy well.
wheels have gone to have 4 new tyers fitted and will be back tomora so they will be fitted
thats it till tomora when every fing will be fitted, if any one wants to pop along and help more than welcome too
|
flybikeslee
Member
Registered: 2nd Jan 07
Location: Liverpool
User status: Offline
|
good stuff
|
taylor2008
Member
Registered: 3rd Nov 08
Location: wolverhampton
User status: Offline
|
hey all well today the body kit and wheels are all on fitted and looks spot on, and a few problems along the way one of the worst was the rear passinger side arch it was rotton so the clips wouldnt bite on to the arch so i set about rebuilding the arch, grinde it done firts get ride on all the lose bits and then 4 layers of some loctite rust stuff the bolocks turns the metal to black and it goes rock hard so once i had finished all 4 coats of it i mixed up some fiber glass and rebuilt it once that went off then adde'd some under seal all over the fiber glass, then i coated all off the under arch is black stone chip, then once that had finally gone off i set about putting all arch's on then finally side skirts, onece i had fitted all the kit it was just a case of waiting for my wheels to arrive then ding dong they were hear so then fitted them and that was it , loads of pics to come once upload'd them
|
taylor2008
Member
Registered: 3rd Nov 08
Location: wolverhampton
User status: Offline
|
the arch before repairing
[img] [/img] [/img]
fiber glass
[img] [/img] [/img]
then ground it down leval so the arch would bolt on level
[img] [/img] [/img]
then painted the inside with under seal (both side's)
[img] [/img] [/img]
[img] [/img] [/img]
bumper and skirts finished
[img] [/img] [/img]
[img] [/img] [/img]
rear drums same colour as the wheels
[img] [/img] [/img]
[img] [/img] [/img]
on the kit goes
[img] [/img] [/img]
[img] [/img] [/img]
[img] [/img] [/img]
then my wheels arrived
[img] [/img] [/img]
|
LukeD
Member
Registered: 23rd Jan 07
Location: Shropshire
User status: Offline
|
very nice; loving the colour of the wheels
|
taylor2008
Member
Registered: 3rd Nov 08
Location: wolverhampton
User status: Offline
|
few pics
[img] [/img] [/img]
[img] [/img] [/img]
[img] [/img] [/img]
[img] [/img] [/img]
[img] [/img] [/img]
|
taylor2008
Member
Registered: 3rd Nov 08
Location: wolverhampton
User status: Offline
|
little update.,,
i had some 60 mm front springs lieing around in the shed and had a go at putting them on inbeyween the rain i finnaly put them on had a few problems tho as the shaft was spinning as i were trying to undue finnanly solved with a pair of molgrips, im unsure about them it looks better yes but driveing it no, to bouncy for my like'ing , il try and ajust the front struts and make them softer if i can find out how to.
and i have got some a set of r1 carbs comeing soon, so they will be going on pretty soon hopefully, just need to order manifold and throttle cable and then they will be ready to fit
[Edited on 03-09-2009 by taylor2008]
|
FruitBooTeR
Member
Registered: 18th Jan 07
Location: Wolverhampton Drives: S15
User status: Offline
|
Looking class mate!
I dont understand how u got the skirts to go on so well??? I used sooo much tape and i still got little gaps where it didnt sit agaisdnt the car properly! espeicaly at the L-Piece end 
|
taylor2008
Member
Registered: 3rd Nov 08
Location: wolverhampton
User status: Offline
|
quote:
Originally posted by FruitBooTeR
Looking class mate!
I dont understand how u got the skirts to go on so well??? I used sooo much tape and i still got little gaps where it didnt sit agaisdnt the car properly! espeicaly at the L-Piece end
cheers, i put 2 clips on ,1 either end to help hold it in place while tiger seal went off and a bit off tape, and screwd them on too under neith the jacking point covers.
|


